
New guidelines are available in the learning center
Introduction
All 3D printers need host software to function. Host software is responsible for sending the actual commands to the 3D printer that tell the printer how to build an object. Most host software communicates with the printer via a wired USB connection. For most 3D printers, a computer running the host software must stay connected to the 3D printer at all times during use.
An increasing number of 3D printer operators are looking for ways to use their 3D printers remotely. Wireless 3D printing has a number of advantages over the traditional wired setup:
- The 3D printer can be placed away from the operator’s work area, which reduces disruptive noises and smells generated by all 3D printers.
- Reducing the number of cords provides a cleaner setup.
- The 3D printer can be operated and monitored with a phone or tablet that is not normally capable of running host software.
- Sharing a 3D printer is easier as it does not require sharing the connected computer.
- The 3D printer can be operated from anywhere in the world over the internet.
There are basically two ways to do wireless 3D printing. First, a g-code file can be saved onto an SD card using a computer, then the SD card can be transferred to the 3D printer where the print job is initiated via a controller build into the 3D printer.
This arrangement technically allows wireless 3D printing, but it lacks most the advantages of a truly wireless setup as described above. The 3D printer can still be placed away from the designer’s work area, but beyond that, using the SD card transfer method is no different from transferring the data over a cable. The second way to do (truly) wireless 3D printing is by running the host software on a small embedded device, like the Raspberry Pi, that is connected to the 3D printer.
This is a bit like using a dedicated computer for 3D printing that stays connected to the printer at all times. But, instead of using a fully-fledged computer for this purpose, the host software can be run on something like a Raspberry Pi, which is just powerful enough to run the software.
The two most popular host software packages developed for wireless 3D printing are OctoPrint and AstroPrint.
This post compares these two popular systems. Before beginning the comparison, it should be noted that OctoPrint and AstroPrint are not true alternatives in the strictest sense of the word.
AstroPrint is, in fact, based on OctoPrint. However, the AstroPrint team has made sweeping changes and additions to the software, making these two host software offerings quite a bit different in many ways.
What is OctoPrint?
As mentioned above, OctoPrint is 3D printing host software. OctoPrint replaces the host software you normally use to run your 3D printer, like Repetier or Cura.
From the OctoPrint website,
OctoPrint differs from existing host solutions in that its major focus is to provide a web interface that allows controlling the printer remotely from anywhere on the network or even the internet while offering the same responsiveness and feedback options available on native host applications like the ones listed above.
OctoPrint was developed to be run on small embedded devices such as the popular Raspberry Pi. It allows you to turn your existing 3D printer into a WiFi enabled one and untether it from your laptop or work station.
What is AstroPrint?
AstroPrint, like OctoPrint, is 3D printing host software that replaces the software normally used to control 3D printers, like Repetier or Cura. AstroPrint is based on OctoPrint, but the development team 3Dagogo, have made sweeping changes and additions to the software.
AstroPrint provides a web interface for performing all of the functions needed to work with a 3D printer remotely, including internet-based slicing of STL files. This means that, with AstroPrint, you will be able to control your 3D printer entirely from your phone or tablet; you will not need to use a computer for any part of the process (unless you are designing a custom part).
Both AstroPrint and OctoPrint can be used with a Raspberry Pi, but additionally, AstroPrint offers a bespoke controller for running its software, called the AstroBox.
Installation of OctoPrint
OctoPrint is most commonly installed on a Raspberry Pi, although it can also be installed on PCduino, there just aren’t very many tutorials for doing this. The installation processes for OctoPrint and AstroPrint on the Raspberry Pi are almost exactly the same. The installation process for OctoPrint goes like this:
- Download the Raspberry Pi image for the OctoPrint, called OctoPi (use one of the mirrors)
- Install the image onto the Raspberry Pi’s SD card
- Set up the OctoPrint software (next section)
For detailed instructions on setting up a Raspberry Pi with OctoPrint, visit theOctoPrint website.
Setting up OctoPrint on the Raspberry Pi is just a tiny bit more difficult than the setup process for AstroPrint because OctoPrint, as a community-driven project, is a little bit more fragmented. You need to use mirrors to download the OctoPi image and make certain you have the latest version.
Installation of AstroPrint
If you purchase AstroPrint’s dedicated hardware, the AstroBox, the hardware setup is as easy as plugging in the device. (P.S: you can also make your on AstroBox for free with a Rasperry Pi)
For setting up AstroPrint on a Rasberry Pi, the process is almost identical to the process for OctoPrint.
- Download the Raspberry Pi image for the AstroPrint (requires registration)
- Install the image onto the Raspberry Pi’s SD card
- Set up the AstroPrint software (next section)
Documentation for installing AstroPrint on a Raspberry Pi is a bit more sparse than the documentation for OctoPrint. So, I actually wrote a tutorial on Instructables to cover the process.
Setting up AstroPrint on the Raspberry Pi is extremely easy because the code base is more unified than OctoPrint. Just go to AstroPrint’s website and download the Raspberry Pi image.
OctoPrint vs. AstroPrint, Software Setup
Setting up the OctoPrint software is not easy. If you are unfamiliar with Linux and/or networking basics, the process will be downright difficult.
First of all, setting up OctoPi to connect to your WiFi network requires modifying one of the configuration files on the SD card; thankfully the modification is a simple one and easy to accomplish, but it is just not as seamless as the graphical interface used by AstroPrint.
Second, unlike with AstroPrint’s setup process, which can be done entirely from a computer, phone, or tablet, to set up OctoPrint you need to connect the Raspberry Pi to a monitor, keyboard, and mouse. Then OctoPrint provides a command prompt interface for adjusting various settings. The only alternative to this is connecting to the Raspberry Pi via SSH and using the command line to complete the initial configuration.
Even after you go through the confusing setup process, your OctoPrint is fairly unlikely to work right away. Many people have a fair bit of difficulty getting the OctoPi to work. I’ve heard the process sarcastically described with a quote from Butterfly Circus, “The greater the struggle, the more glorious the triumph!”
Anyway, setting up OctoPrint on a Raspberry Pi is not for the faint of heart.

OctoPrint User Interface
The design of the user interfaces is where OctoPrint and AstroPrint really differ. The two systems have fundamentally different design philosophies.
OctoPrint is designed for a user with much more 3D printing experience than AstroPrint. OctoPrint exposes many more options in any given interface allowing the user finer control over their 3D printer than is possible using AstroPrint. OctoPrint also feels much more utilitarian.
OctoPrint has a monochromatic color scheme, just grays and blues, whereas AstroPrint’s interface is bright and colorful. OctoPrint uses standard square and rectangular buttons arranged in boxes around the screen, wheres AstroPrint uses 3D buttons and fancy graphics in their interface.
A good example of the fundamental differences between these two systems is the manual printer control interfaces. Both OctoPrint and AstroPrint allow the user to remotely control the 3D printer by moving the axes, heating the hot end, extruding filament, and toggling fans.

You can see that there is nothing fancy in this interface, it is built for functionality, not to look pretty. More importantly, you can see that the OctoPrint interface offers more control options than the AstroPrint interface to the right.
The biggest weakness in the OctoPrint interface is that is does not work particularly well on mobile devices. The interface does not scale to fit on a phone screen, much less rearrange the controls for better visibility on small screens.
Many of the buttons are also not quite large enough for easy finger tapping. In contrast, the AstroPrint interface features large buttons that are easy to see and easy to select on a mobile device.
AstroPrint User Interface
OctoPrint and AstroPrint have fundamentally different design philosophies.
OctoPrint is designed for a user with much more 3D printing experience than AstroPrint, whereas AstroPrint is designed to be easy to use and easy to understand.
AstroPrint keeps things simple; the interface provides access to the functionality the user needs to complete their job, while leaving out more granular controls. The AstroPrint development team has clearly put effort into making their interfaces clean and uncluttered. AstroPrint also has a more visual design than OctoPrint.
A good example of the fundamental differences between these two systems is the manual printer control interfaces. Both OctoPrint and AstroPrint allow the user to remotely control the 3D printer by moving the axes, heating the hot end, extruding filament, and toggling fans.

The AstroPrint interface is not very much different than the OctoPrint interface, the basic controls available are exactly the same, with the exception, again, of some more advanced controls being omitted from AstroPrint. The AstroPrint interface is colorful and beautiful.
AstroPrint also works much better on mobile devices than OctoPrint. The AstroPrint buttons are large and are easy to tap with a finger on a phone. The AstroPrint interface is also responsive, meaning that the controls rearrange themselves based on screen size.
On a computer screen the controls are arranged horizontally, but on a phone screen they stack vertically. AstroPrint is much, much easier to use on a phone.
Printing Experience with OctoPrint
Of course, the main purpose of both OctoPrint and AstroPrint is to actually do 3D printing. Again, OctoPrint and AstroPrint have fundamentally different design philosophies for the interfaces each system provides for monitoring prints.
The main element on the OctoPrint interface is a temperature versus time graph. It makes some sense to display this information in the interface because temperature management is important for getting top quality 3D prints. But again, this kind of information is best for experienced 3D printer operators.
In the OctoPrint interface, basic information about the print, most importantly the print time, and time left, can be found as relatively small text in the upper-left corner of the screen.
The biggest weakness of the OctoPrint interface is that the information in this print status area can be difficult to read, especially on a mobile device.

Note that before printing, a g-code file must be generated and uploaded to the OctoPrint server. So, most of the time, you will still need a computer to print with OctoPrint. If you want to use OctoPrint entirely from a phone, you could actually use AstroPrint’s cloud slicing service as a stand-alone product.
Of course, at that point, you might be strongly considering using AstroPrint for the entire printing process. There are a few fledgling online slicing services being developed right now to compete with AstroPrint, but at the time of this writing, AstroPrint is the only real option for cloud slicing.
Printing Experience with AstroPrint
Of course, the main purpose of both OctoPrint and AstroPrint is to actually do 3D printing. Again, OctoPrint and AstroPrint have fundamentally different design philosophies for the interfaces each system provides for monitoring prints.
As with the user interface in general, AstroPrint displays the most important information in a large, colorful, easy-to-read format.
The main elements on the print management interface for AstroPrint are the time left in the print, and the printer status. Information that is likely less important for non-expert 3D printer operators, like the volume of filament, and data transferred, are omitted. Lower on the screen, information about hot end and bed temperatures is available, but not in graphical format.
Again, AstroPrint is much easier to use on a mobile device than OctoPrint.

One of the best features of AstroPrint is its cloud slicing service. With OctoPrint, 3D models must be processed by slicing software on a computer, and the resulting gcode must be uploaded to the OctoPrint server. With AstroPrint, slicing is done via AstroPrint’s servers. This means there is no need for a computer at all, for any part of the printing process. Just download a model you want to print from one of the services provided on the AstroPrint Dashboard, and get printing. You can do everything from a phone or tablet if you want.

Conclusion
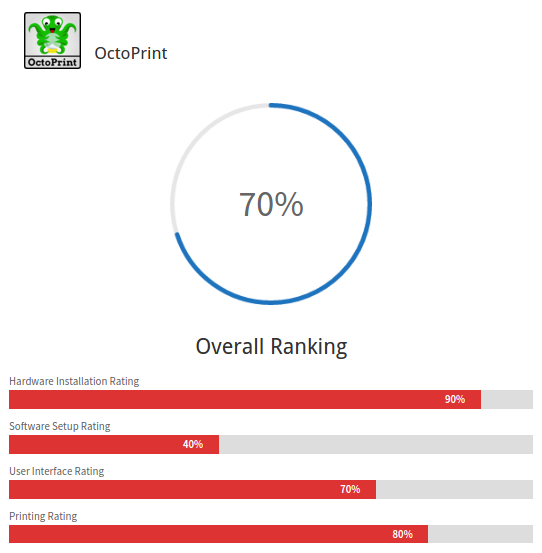
Overall, both OctoPrint and AstroPrint are great 3D printing host software offerings. I think AstroPrint is a more polished package than OctoPrint, on which AstroPrint is based. The AstroPrint development team has clearly put a great deal of effort into making the user experience as simple and streamlined as possible.
But, the most important difference between OctoPrint and AstroPrint is that they are built for two different groups of users.
OctoPrint is made for experienced 3D printer operators who want complete control over their 3D printer settings. OctoPrint provides access to extensive customization options, and provides data that experienced Makers can used to fine tune the performance of their printer and OctoPrint itself.
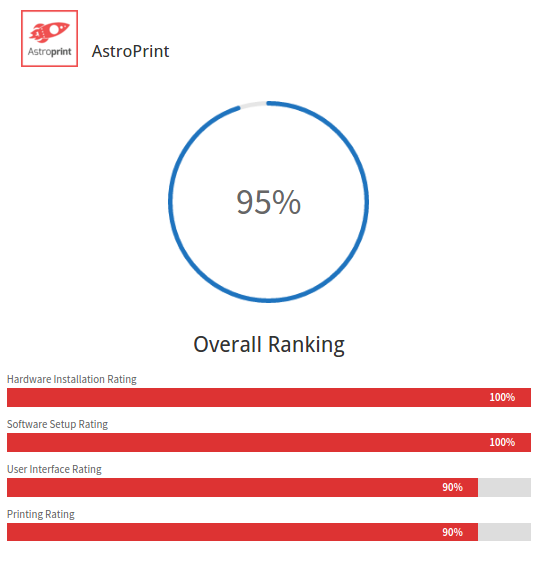
AstroPrint is made for 3D printer operators with a low to intermediate level of experience. AstroPrint is focused on providing a smooth and fast user experience. AstroPrint is much easier to set up than OctoPrint, and requires less configuration from the user.
AstroPrint is also fantastic on a mobile device like a phone or tablet. AstroPrint features large, colorful buttons that are easy see on a small screen and easy to tap with a finger.
This post was originally published on Dabbletron and republished with the authors permission.