

It is time boys and girls.
One of the most requested features of AstroPrint is now live!
You now have the ability to save your custom slicer settings for future use.
Background
A lot of AstroPrint users experiment and tweak various slicer settings in order to get the desired effect from their prints. This testing process can be a very time consuming ordeal.
Naturally, the problem has remained: After you figure out the most optimum combination of slicer settings for a particular printer, design and material type, what then? Do you write this down on a napkin and stash it away for future use?
So far, the annoyance of having to re-enter custom slicer settings has been very frustrating for many of our users.
“..I like your slicing service, but for me, the biggest reason to go back to offline slicing was the missing ability to save my own custom slicer settings/profiles. I can’t start all over again for every iteration of my design or when experimenting with smaller changes in settings..” – AstroPrint User
It’s a massive pain in the ass and we apologize for taking so long.
But, fret not, because you can save all the custom settings you want now!
Let me show you how.
How to Save Custom Slicer Settings
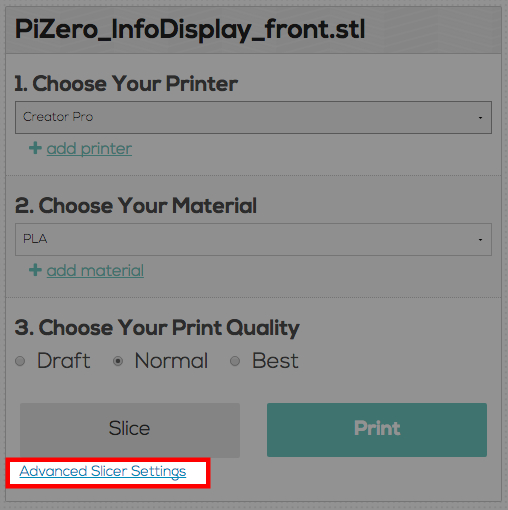
When you are in the process of creating a new print file, notice the Advanced Slicer Settings link.
First, select a printer and material type. Then open up Advanced Slicer Settings.
As usual, this link will open up Advanced Slicer Settings. This is where you can tweak and experiment with various settings for your respective slicer.
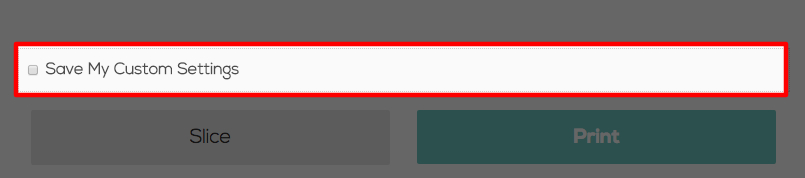
After you are done tweaking/modifying your slicer settings, you will see the option to save those settings.
You can enable this option by simply checking the Save My Custom Settings option.
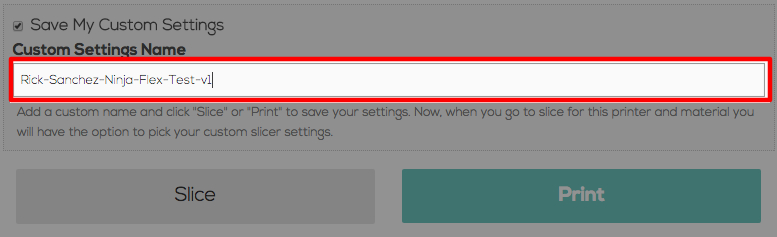
You now have the option of naming your custom settings (40 character limit).
Once you are done naming your custom settings, you can either SLICE or PRINT your design.
As long as the Save My Custom Settings option is checked, your custom settings will be saved regardless of whether you SLICE or PRINT your file.
That’s it!
From now on, whenever you create a new print file, you will see your custom settings in the Choose Your Print Quality section of the interface.
Important note: In order for you to see your custom settings in the future, you have to select the EXACT printer and material type you chose when you originally created those custom settings. Otherwise, those custom settings will be hidden. So, the next time you are confused about where your custom settings are, check to see if you have chosen the correct printer and material type.
Deleting or Editing Custom Slicer Profiles/Settings
In order to delete or edit your newly created Custom Slicer Settings, navigate into your AstroPrint dashboard and go into My Slicer Settings.
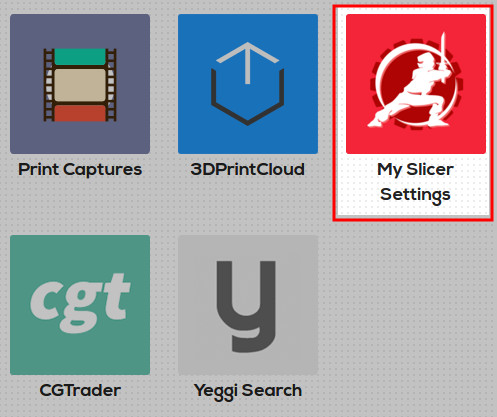
Once you are in the My Slicer Settings page, you can modify or delete your custom slicer settings.
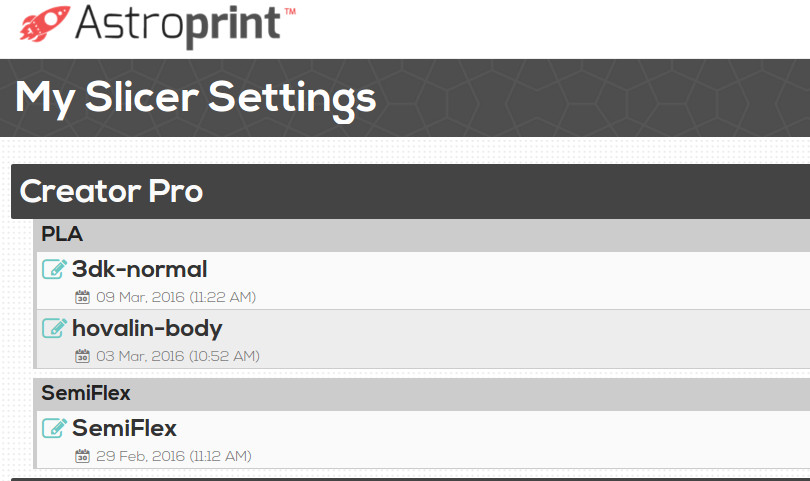
How custom slicer Profiles/Settings are organized
Custom slicer profiles/settings are organized by printer and material type. The reason we made this UI/UX decision was to improve the organization of newly created custom slicer profiles/settings. Organizing newly created custom slicer profiles/settings by Printer and Material Type significantly reduces having a sea of newly created custom slicer profiles/settings. It also reduces the chances of a user accidentally using the wrong custom slicer profile when printing because those custom profiles won’t even be visible if the user fails to select the proper Printer and Material Type combination.
Finally, all of these custom slicer settings can be accessed and managed in the My Slicer Settings section in the dashboard.
The Future
Keep in mind that this feature is still in beta. We encourage you to play around with it and make mental notes of what you hate about the feature. If you have any questions, comments or suggestions regarding this feature please let us know in the forums.
May the 3D Printing gods keep your nozzle in order 🙂