We’ve released a bunch of features that should make 3D Printing a bit smoother on AstroPrint.
These features aren’t necessarily huge, but it should certainly make your workflow easier.
While a few of these features (like Print Preview) are fairly obvious, unavoidable and straightforward — a couple of them (namely, Notes and Tweak Settings) are a bit hidden on the platform.
Here’s a quick summary of what we will cover:
- Print Preview – When you are trying to print a file, the Print Preview screen will give you an estimate of how long the print will take along with options to discard the print file and check to make sure your bed is clear.
- Notes – You now have the ability to include custom notes on any print file(s) for additional clarity in organizing your files
- Tweak Settings – You also have the ability to Tweak Settings from your last print when you are experimenting with settings — without having to start all over again.
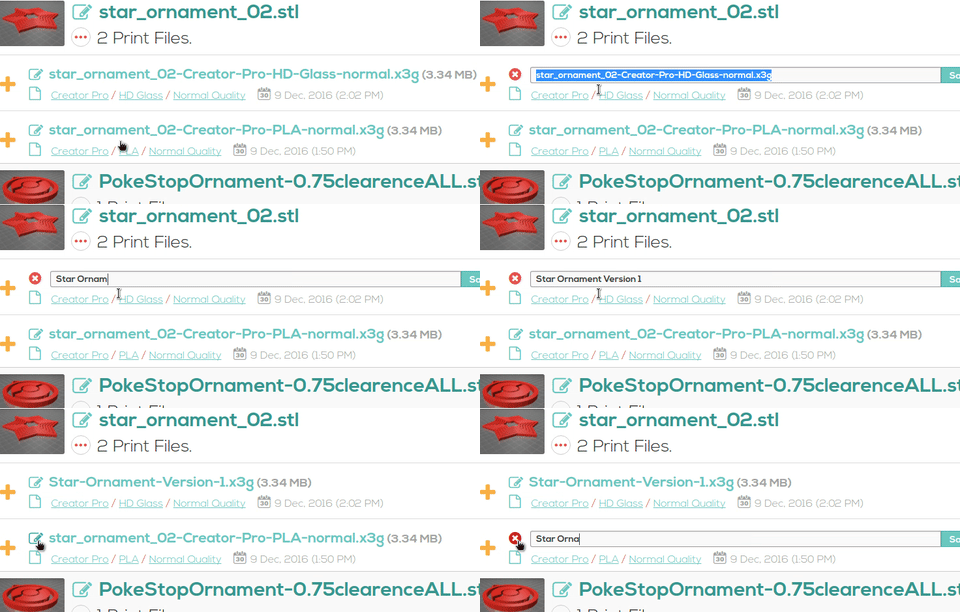
- Print File Name Changes – Fairly self-explanatory. You can now change the confusing file name(s) on any print file(s).
My intention with this blog post is to simply clarify these features as quickly and clearly as possible.
First up…
Print Preview
Once you create a new print file in the process of printing, you’ll be greeted with a new print preview screen.
In the Print Preview screen, you have the ability to:
- Get an estimate of how long your print is going to take
- Confirm that your bed is clear before printing
- Discard the print file if you are not satisfied
The above is a useful checklist to review before starting any print.
If you decide to discard your print file, you’ll need to re-slice your design file again until you are satisfied with the results.
Since this print preview screen is unavoidable, you can be sure that you’ll reduce the chances of being surprised by the print time or accidentally printing on an occupied print bed.
How to add Notes to Print Files
This particular feature is quite useful when you are experimenting with multiple print files. For example, if you have made subtle tweaks to each print file, you can simply include a note with each print file so you don’t have to rely on your memory.

Remember: You also have the ability to rename the actual filename of design/print file(s).
If you use notes in conjunction with custom file names, it should significantly improve your file organization.
Once you insert a new note, you should see a visual change in the Icon to indicate your new note.
Naturally, the better your organization, the less you’ll have to rely on your memory.
Deleting Notes
If you need to delete a note, you’ll have to click on the Notes Icon, clear out the Notes textbox and hit SAVE NOTE. You should see the NOTES Icon change back to its original state if this operation was successful.
How to Tweak Settings without starting over
Let’s say you are making tweaks to a specific print to get all the settings dialed in.
Instead of starting over, you can now preload all of the slicer settings from the previous print and simply tweak those.
This means that, once you click the “Tweak Settings” button in the context menu from the File Manager, it will open up the Advanced Slicer Settings window with settings pre-loaded from your previous print.
This feature should help you speed up your experimentation while tweaking slicer settings.
Keep in mind, once you get all the settings dialed in, you can save your Custom Slicer Settings for future use.
How to change print file names
Fairly straightforward. Right above the Notes Icon, you’ll notice an Icon that will allow you to edit and rename your existing Print File(s).
Once again, the motivation behind this is to help you organize your file(s) better.

That’s all for now 😉
If you have any suggestions on improving any of the features above, please let us know via our forums or twitter. We make a concerted effort to incorporate your feedback into future iteration(s) of AstroPrint – your feedback is literally what drives our platform. Thanks!
— Dilanka

